Creating a training simulator out of a Blanik L-13 cockpit, using original controls, multiple potentiometers and a couple of dual action hydraulic rams.
Saturday, 8 December 2012
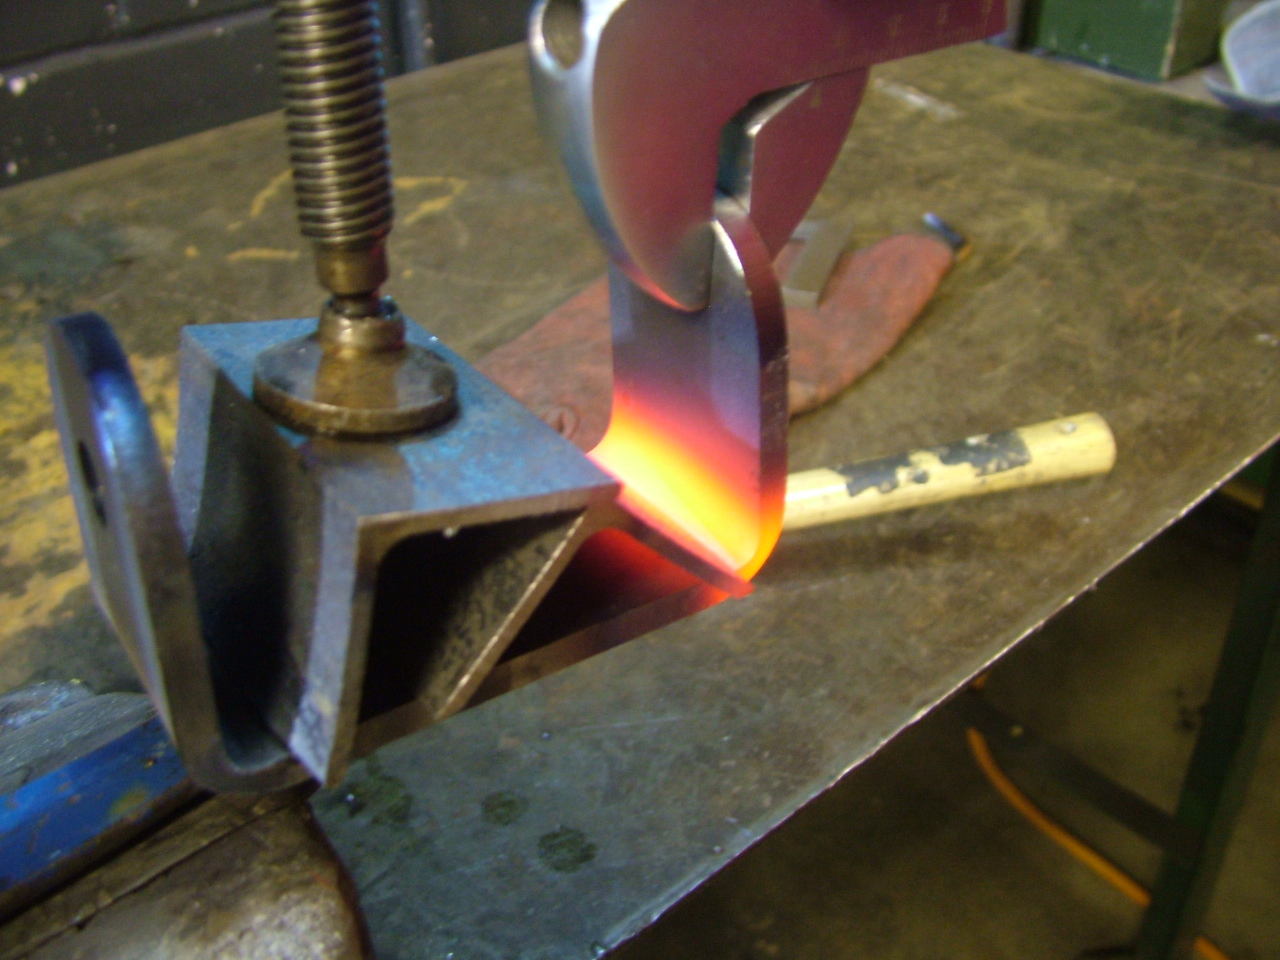
I admit, it would have probably been easier to cut the steel plate for the U-joint to size and weld it together. But then I wouldn't have had the chance to flail around with an oxy-acetylene torch that sounded like a jet taking off, and a spanner the size of my arm. :D Once the brackets had been bent to shape, I machined 4 brass spacers on the large (and slightly menacing) eastern bloc lathe. Once I'd finished battling it's intrinsic design flaws, I considered delicately assembling the U-joint. I then remembered that I had a physics paper to do for tomorrow, so I hit the pins repeatedly with a hammer until they went in. Job done.
Monday, 3 December 2012
It's been a little while since the last update, so here's what's been happening. I started building the U-joint - this will take almost all of the weight of the cockpit so it's quite important I get it right! I've also been fighting my way through a maelstrom of paperwork trying to work out how I'm going to attach the U-joint to the cockpit frame, and to the base itself. I am yet to have a revelation!
Thursday, 22 November 2012
After a lesson of solid drawing and planning I had a pretty good manufacture session last night. I've bolted some steel plates through slots in the floor that I cut last time. These plates then have 3mm box section welded on to form a frame. This will form the mounting point for the universal joint - when I finally get round to making it! Aside from some slightly dodgy welding in places (it's been a while) and a burnt hand (I tried to turn it over by picking up the end I'd just welded...) I think it went well!
Monday, 19 November 2012
Great news! I now have a solid direction to go in so I can ramp up the pace, finish the development stage and get manufacturing. I've decided to make a large universal joint out of steel plate, which will allow the simulator to move through 2DOF - see the video! (Unfortunately the auto-focus wasn't up to the challenge...) Now I just need to decide how to mount the fuselage and universal joint onto the main frame. In the current model I've gone for a pyramid idea, but that may change.
Friday, 16 November 2012
Finally - in glorious technicolour! (With added annotations!)
Sunday, 11 November 2012
Building has commenced! Or at least some more localised destruction... I've cut some slots in the fuselage to mount some metal plates on, which will form the support points for the frame. And I now have a passionate hatred of jigsaws. Bloody noisy stupid things... but good at cutting sheet aluminium!
Wednesday, 7 November 2012
After lengthy discussion, I've decided to go for a 2 cylinder design. Although having 3 cylinders would simplify the frame considerably, there would be major problems surrounding the complexity of the hydraulic control system. Therefore, the new design is currently looking something like this! All I need to do is find a big enough ball and socket bearing for the job, and then we're away!
Saturday, 3 November 2012
I thought it was about time I whipped up some scale models, so I know just what I'm dealing with. Ignoring the fact that the kitchen was starting to resemble a snow globe by the time I'd finished, I think it worked quite well!
Wednesday, 31 October 2012
After much deliberation, I've decided on roughly which style I'm going to go for. There were several other options, including a frame within a frame design, but I've settled on the relatively simple option even though it has the added expense of 3 cylinders instead of the 2 on the other ideas. However, there is a potential problem in having a mechanical valve system that can perform all of the movements necessary. I've emailed a load of hydraulic companies in the hope that they can offer some insight, but if anyone reading this has any ideas then please let me know!
Sunday, 14 October 2012
Sorry about the lack of posts, I'm in the thick of the design stage at the moment. As you can see from the calculations sheet, where I have the pivot point is obviously going to have a massive effect on what angle of movement I can get. With the pivot point at the back, I can get 28.4° downwards before the nose hits the ground. However, this is with the cockpit mounted 1m up. With the pivot point in the centre, I can get 47.2° from 1m up. On the other hand I could keep the 28.4°, but the cockpit would only have to be raised 50cm, making access much easier. On the downside, this means finding a ball and socket bearing large enough to take the required loads, and working out how to attach the damn thing to the bottom of the cockpit! Decisions, decisions!
Wednesday, 26 September 2012
What do you need to cut a glider cockpit in half? A reciprocating saw and a hacksaw, that's what! After 2 hours of very loud noises we finally managed to get it apart, which will allow me to construct a mock up frame and work out where the hell I'm going to put the hydraulic rams!
Thursday, 20 September 2012
We've taken the executive decision to cut the cockpit in half behind the first seat. This will mean that we can get much greater angles of pitch and roll without the entire thing being miles off the ground! These pictures are the result of me preparing it to be cut in half. I've removed the rear joystick and a couple of the control cable fittings, and the flap and spoiler controls have been disconnected. The landing gear controls were proving tricky (They are locked in place and the split pin is impossible to get at...), so we took the combat engineering approach and grabbed a large pair of bolt cutters. :P
Thursday, 13 September 2012
My stunningly sophisticated modelling equipment. It's a start, ok?
Monday, 10 September 2012
You can barely notice it's there! :P
Tuesday, 4 September 2012
I think it's safe to say that we got a couple of funny looks :P
Monday, 3 September 2012
Cradle finished and ready to go!!
Sunday, 2 September 2012
Here are the photos from the weekend.
Tuesday, 28 August 2012
Managed to get a bit done over the bank holiday. All of the the control cables are now coiled and named, and I have a transport and work frame! The castors should be here by the end of the week, so once those are attached I'll have a movable frame that I use to work on the cockpit - strip out, connect up the controls, sort out the pots, etc until I build the big permanent frame that will house the hydraulics.
Tuesday, 14 August 2012
Well, I'll admit there's been a bit of a break. This was due to the entire project being in jeopardy as my teacher was unsure as to whether it would satisfy the complexity requirements. Sure, it's gonna be hard work, but in the end it's just connecting up some wires and building a frame. Then my Dad and I had a thought. Movement. Damn tricky, but we would end up with a brilliant training tool that would smash the A level requirements at the end of it. We looked through all of the options: Electro pneumatic actuators. Not enough power, too slow and too little range. Suspending the entire fuselage and adjusting the wires to tilt it. Failed due to complexity and safety concerns! So we finally settled on hydraulics (the obvious choice). Fairly compact, powerful, and with a large enough range. The only downside being that they are a bit on the pricey side. Nevertheless, my ever entrepreneurial Dad said he would finance them. (Probably because he wants exclusive usage rights when it's finished!) Now that the project is rolling again, I need to talk to our resident hydraulic company (wait for them to finish laughing then explain that I'm genuinely serious!), work out how the hell I'm gonna get the hydraulics synchronised with the computer output (any suggestions would be gratefully received!) and strip out the cockpit! On the upside, we went to Tangmere the other day, and I had a look at their excellent Lightning simulator (Do it! It's awesome!). Bob kindly showed me how they had connected the controls to the potentiometers, so I have some idea of what I'm aiming for on that side. Also, my gliding instructor has given me a load of rotary potentiometers, connectors and the computer interface. A good start! Anyhow, I'll keep this page updated with how it progresses!
Tuesday, 5 June 2012
Finally managed to get the scanner to play ball, so here are all the measurements we took yesterday.
Monday, 4 June 2012
After cutting up the fuselage we attacked it with a tape measure and a pair of scales. I genuinely think that we now know more about the cockpit than the designers do!
We decided that the best place to cut the fuselage was was behind the wing root. I can tell you, we got some funny looks when we drove past one way with a whole glider and back the other with half!!